Design
MIDlet architecture
In the TouristRoute MIDlet, all the UI layer
classes are included in the com.nokia.example.location.tourist.ui package. Model layer classes and interfaces can be found from the com.nokia.example.location.tourist.model package. Only the
model layer classes use the Location API. To get acquainted with the
Location API, the model layer classes are the most interesting ones
to look at. The UI layer classes only contain the UI implementation
and command controller logic of the MIDlet and therefore do not help
in learning how to use the Location API. The following figure shows
the classes and their relationships in the MIDlet.
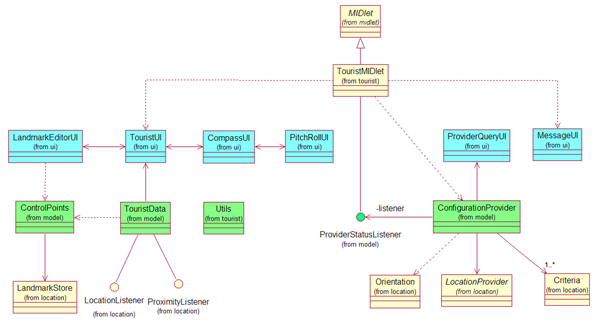
Figure: TouristRoute MIDlet class diagram
The model layer classes and interfaces implement the following tasks:
ControlPointshandles all operations related to the landmark store.TouristDatalistens for events throughLocationListenerandProximityListenerand handles data updates to theTouristUIviewer class.ProviderStatusListeneris an interface that is used to deliver the location provider selection notification. In addition, this interface is used to deliver the information thatLocationProviderhas successfully started to receive location updates (for example, from a GPS module). The MIDlet listens for events through this interface.ConfigurationProviderhandlesLocationProviderselection during the MIDlet startup stage. After a location provider is selected, a notification event is sent back to MIDlet through theProviderSelectedListenerinterface. In addition,ConfigurationProviderchecks for orientation detection support and provides access to theOrientationclass of the Location API.
MIDlet startup sequence
The MIDlet startup performs an automatic location provider search. The MIDlet use can begin after the location provider is found and the MIDlet is capable of receiving location update events.
The use of a network-based location provider
may require the user to pay a fee. The MIDlet first tries to find
a free location provider from a set of predefined location providers.
If a free location provider (for example, a GPS module over a Bluetooth
connection) is found, the location provider search ends. If no free
location providers are found, the MIDlet prompts the user whether
they want to use a non-free location provider service. If the user
allows this, the MIDlet continues the search with non-free providers.
The MIDlet uses predefined cost Criteria in searching
for non-free location providers. When a location provider is found
and selected, the MIDlet receives a providerSelectedEvent.
At this point, the MIDlet registers to listen for events
from the selected location provider. The first position calculation
may take a while, especially when using a GPS module as the location
provider. This is why it may take some time for the first locationUpdated event to arrive in the TouristData class. When the first locationUpdated event arrives,
a firstLocationUpdateEvent is sent to the TouristMIDlet class and the MIDlet UI (TouristUI) is set to visible.
Note: Some location modules may take longer to start than others and the states of the module can differ between module manufacturers. This means that you need take into account that the first location fix can take some time to retrieve due to the module startup time and satellite signal strengths.
The following sequence diagram shows how the MIDlet searches for location providers during startup.
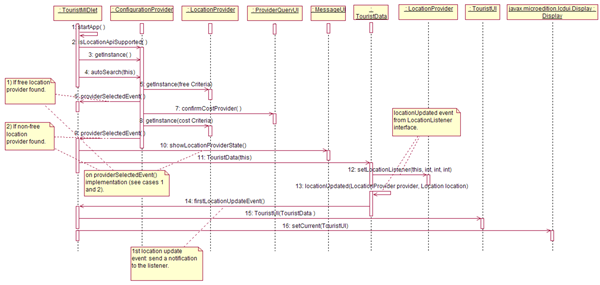
Figure: MIDlet startup sequence
MIDlet UI
After startup, when a connection to a location provider
is available, the MIDlet switches to the route view (TouristUI) and begins updating the device location information.
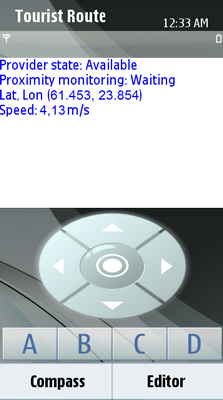
Figure: Route view
By selecting Editor in the route view, the user can switch to the landmark editor view. In this view, the user can edit address information for the current device location. By selecting Save in the landmark editor view, the address information is saved to the device's landmark store. Selecting List switches the landmark editor view to the landmarks list view without saving the landmark. The landmarks list view contains all the saved landmarks. Selecting Save in the landmark editor view also switches the view to the landmarks list view.
Devices and emulators that support orientation detection have the extra Compass command available in the route view. Selecting Compass switches the route view to the compass view, which shows compass information.
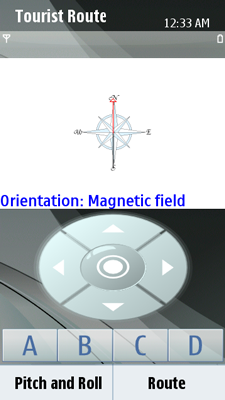
Figure: Compass view
Selecting Pitch and Roll in the compass view switches the current view to the pitch and roll view. The pitch and roll view displays the device's pitch (tilt) and roll (rotation in degrees around the device's own longitudinal axis).
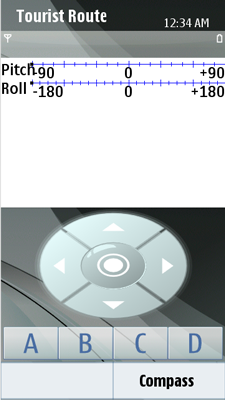
Figure: Pitch and roll view
From a code point of view, the use of the MIDlet begins from
the TouristUI canvas class, which implements the
route view. From the TouristUI, the user can switch
either to the LandMarkEditorUI, which implements
the landmark editor view, or to the CompassUI, which
implements the compass view. Note that switching to the CompassUI is possible only if the device or emulator supports orientation
detection. The CompassUI allows the user to switch
to the PitchRollUI, which implements the pitch and
roll view. All the UI classes allow the user to switch back to the
previous view. The following figure shows the navigation between the
UI views implemented by the classes.

Figure: UI view changes
The UI classes perform the following tasks:
The
LandmarkEditorUIlists stored landmarks. It also allows the user to create new landmarks and remove existing landmarks.The
TouristUIdisplays information about the device's current location, for example, latitude and longitude coordinates, moving speed, and distance.The
CompassUIdraws a compass on the screen. It also provides information about the compass type.The
PitchRollUIdisplays pitch and roll information about the device's orientation if the device has a 3D compass sensor.
Implementation
For instructions on how to implement the MIDlet, see section Implementation.