Implementing the splash screen
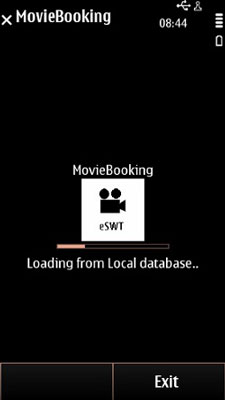
When the MIDlet starts, it displays a splash screen containing
the application title, icon, and progress bar. The progress bar is
used to indicate what is happening while loading the movie database.
Since the loading process can take some time, the splash screen is
used to show the user how the loading progresses. The MovieBooking class listens for messages from MovieDB and informs SplashScreen so that the progress bar can advance.

Figure: Splash screen
The splash screen uses various typed events and listener interfaces
to deal with specialized events. For more information about eSWT API
typed listeners, see the org.eclipse.swt.events package. For more
information about eSWT API untyped listeners, see the Event class.
To implement the splash screen:
Create the
SplashScreen.javaclass file.Import the required classes.
import java.io.InputStream;
import java.io.IOException;
import org.eclipse.ercp.swt.mobile.Command;
import org.eclipse.swt.SWT;
import org.eclipse.swt.events.SelectionEvent;
import org.eclipse.swt.events.SelectionListener;
import org.eclipse.swt.graphics.Image;
import org.eclipse.swt.graphics.Point;
import org.eclipse.swt.layout.FormAttachment;
import org.eclipse.swt.layout.FormData;
import org.eclipse.swt.layout.FormLayout;
import org.eclipse.swt.layout.GridData;
import org.eclipse.swt.widgets.Composite;
import org.eclipse.swt.widgets.Label;
import org.eclipse.swt.widgets.ProgressBar;
import org.eclipse.swt.widgets.Shell;
Set
SplashScreento implementSelectionListener, and create the required variables.class SplashScreen implements SelectionListener { private Composite splashComposite; private Label progressLabel; private ProgressBar progressBar; private Command exitCommand; private MovieBooking main; private Image appImage;Create a new secondary
Shell.SplashScreen(MovieBooking main, Shell mainShell) { this.main = main; // Parent Composite of the splash screen widgets splashComposite = new Composite(mainShell, SWT.NONE); // splashComposite's size and location are controlled // by the GridLayout of the mainShell splashComposite.setLayoutData( new GridData(SWT.FILL, SWT.FILL, true, true)); // Load the application's image InputStream imageStream = this.getClass().getResourceAsStream("/res/splash.png"); if (imageStream != null) { appImage = new Image(mainShell.getDisplay(), imageStream); try { imageStream.close(); } catch (IOException e) { // ignore, in this case it is not relevant } }In the code above, the
appImage =
new Image(mainShell.getDisplay(), imageStream)
code line uses theImageclass to define image resources for the screen.Note that
getDisplayis aWidgetclass method.Create the widgets for the splash screen. The last widget is an unselectable user interface in the form of a
ProgressBar. The minimum and maximum values for the receiver are set to 0 and 10 respectively.// Create the widgets Label titleLabel = new Label(splashComposite, SWT.CENTER); titleLabel.setText("MovieBooking"); Label imageLabel = new Label(splashComposite, SWT.CENTER); if (appImage != null) { imageLabel.setImage(appImage); } progressLabel = new Label(splashComposite, SWT.CENTER); progressLabel.setText("Loading..."); progressBar = new ProgressBar(splashComposite, SWT.CENTER); progressBar.setMaximum(10); progressBar.setMinimum(0);Create a layout for the widgets.
A layout controls the size and position of the widgets. This MIDlet uses a special
Layoutclass calledFormLayout, which controls the size and position of a compositeControl. TheFormLayoutrequires thatFormDataandFormAttachmentare created for each child:FormDatais used to define the attachments of the aControl, whereasFormAttachmentcan be used to define the left, top, right, and bottom edges of each child.The
setLayoutDatamethod is used to first place the image on the screen. After that the title label, progress bar, and progress label are positioned by aligning them with the image and each other.// Distribute the widgets using a FormLayout FormLayout layout = new FormLayout(); splashComposite.setLayout(layout); // Set the image at the center FormData imageLabelData = new FormData(); Point imageSize = imageLabel.computeSize(SWT.DEFAULT, SWT.DEFAULT); imageLabelData.top = new FormAttachment(50, -imageSize.y / 2); imageLabelData.left = new FormAttachment(50, -imageSize.x / 2); imageLabel.setLayoutData(imageLabelData); // Set title label above the image FormData titleLabelData = new FormData(); titleLabelData.left = new FormAttachment(imageLabel, 0, SWT.CENTER); titleLabelData.bottom = new FormAttachment(imageLabel, 0, SWT.TOP); titleLabel.setLayoutData(titleLabelData); // Set the progress bar at the center, below the title label FormData progressBarData = new FormData(); progressBarData.left = new FormAttachment(imageLabel, 0, SWT.CENTER); progressBarData.top = new FormAttachment(imageLabel); progressBar.setLayoutData(progressBarData); // Set the progress label below the progress bar FormData progressLabelData = new FormData(); progressLabelData.left = new FormAttachment(imageLabel, 0, SWT.CENTER); progressLabelData.top = new FormAttachment(progressBar, 0, SWT.BOTTOM); progressLabel.setLayoutData(progressLabelData);Create a new
Commandinstance, and use thesetTextmethod to define the text to be displayed for the command. The command is associated with a typed listener calledSelectionListener, which invokes the appropriate method after an event has been generated by theControl.// Add the exit command exitCommand = new Command(mainShell, Command.EXIT, 0); exitCommand.setText("Exit"); exitCommand.addSelectionListener(this); exitCommand.setDefaultCommand(); } public void widgetSelected(SelectionEvent e) { if (e.widget == exitCommand) { destroy(); main.exit(); } } public void widgetDefaultSelected(SelectionEvent e) { }Create methods for interacting with the progress bar.
    // Set the text of the progress label
    void setLabel(String label) {
        if (!progressLabel.isDisposed()) {
            progressLabel.setText(label);
            splashComposite.layout();
        }
    }

    // Set how many movies will be displayed. In practice it changes the
    // range of the progress bar
    void setMoviesCount(int count) {
        if (!progressBar.isDisposed()) {
            progressBar.setMaximum(count);
        }
    }

    // Advance the progress bar
    void advance() {
        if (!progressBar.isDisposed()) {
            progressBar.setSelection(progressBar.getSelection() + 1);
        }
    }
Create a method for disposing of the splash screen.
    void destroy() {
        exitCommand.dispose();
        splashComposite.dispose();
        if (appImage != null) {
            appImage.dispose();
        }
    }
}