Basic runtime adaptation patterns
There are many advantages to adaptive design, including the following:
To let the code react at runtime to the phone it finds itself, than creating and distributing different versions for each phone.
To reuse the source code and graphics between projects.
To maintain the code quality.
To have a well written piece of code that has few bugs and less maintenance issues than several similar cut-and-paste variants of different target platforms.
Use selective enhancement for optimized features
When developing for Series 40 with multiple versions in mind, avoid designing for only the oldest and most limited platform. Users benefit and demand the new platform features, so treat these as additional layers to be enabled if the phone has that feature.
A complimentary approach is “graceful degradation”, or designing
for the most capable Series 40 phones and letting older phones work
in some fallback mode. Choose graceful degradation if that makes the
most sense for a feature. For example, when there is no Nokia TextEditor (Series 40 6th Edition and older devices), automatically
degrade to TextBox. In most cases, it is logically
simple to design with the idea of turning ON optional features but
ensuring the basic application flow functions well even without those
features.
In the example below, we selectively enhance the display
options for the top decoration of the Canvas based on whether or not there is a CategoryBar available on the phone.
public void showNotify() {
	if (midlet.phoneSupportsCategoryBar()) {
		this.setFullScreenMode(true);
	}

	// Show statusbar
	try {
		LCDUIUtil.setObjectTrait(this, "nokia.ui.canvas.status_zone", Boolean.TRUE);
	} catch (Throwable t) {
		Log.i("showNotify LCDUIUtil", "trait not supported, normal before SDK 2.0");
	}

	super.showNotify();
}
An example MIDlet using this technique:
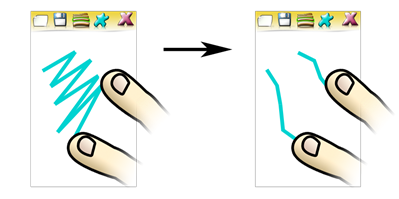
One example of selective enhancement can be found in the Paint MIDlet. It integrates multipoint touch functionality for Series 40 full touch devices while maintaining backwards compatibility with older devices by providing single-touch input, if multipoint touch capabilities are missing.

Figure: Paint MIDlet dynamically enables multipoint touch input when possible
Query the phone capabilities using system properties
Many tests use system properties to query the phone about its capabilities at runtime. These indicate whether some functionality is available or not, or some finer detail about what is available. This method has high performance – it produces no unexpected exceptions. It is limited to properties that can be queried directly or through some indirect test.
In the example below, we ask the phone if it supports Nokia custom size fonts.
//Check for custom size fonts
if (System.getProperty("com.nokia.mid.ui.customfontsize") != null) {
	return DirectUtils.getFont(face, style, size);
}
return Font.getDefaultFont();
The preferred way of using this pattern is to query
the system when launching the application, then setting some final variables based on the results to ensure the rest
of the application can run without the slower process of asking the
phone each time about the property.
In the code below, we check the system property at program start and initialise the font accordingly. The system property will not be checked again, for example during painting.
private static final boolean customFonts = System.getProperty("com.nokia.mid.ui.customfontsize") != null;
...
//Return font depending on capabilities
if (customFonts) {
	return DirectUtils.getFont(face, style, size);
}
return Font.getDefaultFont();
Below is a table listing some features that can be
queried through system properties. The System Property Name is used when calling System.getProperty(“..”).
The Property Supported Response and Property Unsupported
Response columns state the response variants your code should
be designed to expect. You can find full specification on these properties,
including information of which SDKs support the package by searching
for the system property name in the Nokia SDK documentation package.
Feature |
System Property Name |
Property Supported Response |
Property Unsupported Response |
Touch |
|
>= 1 (touch phone) |
Null (keyboard-only phone) |
Multipoint touch |
|
> 1 (pinch and rotate gestures supported) |
1, null (implement zoom and rotation with buttons) |
Orientation change |
|
not null (support dynamic portrait-landscape changes, or lock to one of these) |
null (screen size will not change at runtime) |
Sensors |
|
>= 1.2 |
null, < 1.2 |
Location |
|
>= 1.0 (network-based location services available) |
null (ask the user to specify location) |
Keyboard type |
|
Several |
Unknown |
An example MIDlet using this technique:
DrumKit example checks supports.mixing property to detect
if the system supports polyphonic audio playback. If mixing is supported, multiple Player instances will be used concurrently,
so the user can play several drum sounds simultaneously.
Use indirect reference to test for the existence of a class
In the try-catch pattern, you write a piece of code that you know
might fail on older phones. You surround the selective enhancement
feature with a try-catch block. In some cases, you will implement
an alternative solution for older phones in the catch block. Be careful
to note that some of these tests will throw a JVM (Java Virtual Machine) Error rather than the more commonly caught logical Exception. Catching Throwable will handle
both Error and Exception, for example
in cases where an API either might exist, or might exist in one of
several variants on different phones.
The problem with this pattern is that some exceptions are uncatchable, so it does not work as a universal solution. It is, however well suited for looking up classes that might be missing on older devices.
For example, if you simply use a platform class which does not exist on all phones, you are creating a piece of code which cannot load and run on phones which lack the specified feature.
IconCommand featured = new IconCommand("Home", "Home View", homeImg, drawMaskedImage(homeImg), IconCommand.SCREEN, 1);You might instead test for the existence of this class with an indirect reference. This code loads on all phones and throws a catchable exception to indicate the feature is not supported.
try {
	Class.forName("com.nokia.mid.ui.IconCommand"); //Try to produce the exception
	return true;
} catch (Throwable t) {
	return false;
}
Use tests as above to avoid uncatchable runtime error problems that can arise when attempting to directly create instances of missing classes. If the try-catch test will be used often, it is better to test for the feature once during startup and assign the result to a final variable. This improves application responsiveness and reduces the memory thrash of creating short-lived exception objects.
It is advisable to catch only the narrowest possible exceptions at each level. This will avoid hiding unintended exceptions that may cause bugs in the application, for example when a more critical error is thrown but unexpectedly caught and handled as if it were a different error.
When referencing classes which may not be on every phone,
you can reference them explicitly (com.nokia.mid.ui.IconCommand) in your code rather than import them at the top of the class. If
you import them at the top of your class, your entire class referencing
an optional API must itself become optional and referenced with Class.forName(“com.mycompany.MyClass”).
final Command c;
try {
	c = new com.nokia.mid.ui.IconCommand(..);
} catch (Throwable t) {
// Fallback for older phones
	c = new Command(..);
}
An example MIDlet using this technique:
Paint example uses indirect reference to test the existence
of MultipointTouchListener class. If the class exists,
the multi-point touch functionality will be enabled. If an exception
is caught, the application will fall back to single-touch mode (see
chapter on selective enhancement).
Use the delegation pattern to isolate optional APIs
The try-catch pattern described above is not suitable for catching direct references to phone APIs (classes) which may not exist on all target phones. In such cases, older phones lacking the given class will produce errors that your application cannot catch. Such errors appear as a pop-up to the user and the program exits.
The solution is to create a delegate class – a wrapper – that will encapsulate all references to the optional API.
In the following example, we use a CategoryBarHandler delegate to handle all references to
the CategoryBar in Nokia SDK 2.0 phones. The code
below will also run on Nokia SDK 1.1 and earlier phones, because indirect
references to the delegate class which requires a missing API can
be caught at runtime. In this example, we use the same technique to
replace the default update Command with an animated
icon version, but only on SDK 2.0 and later phones.
try {
	final Class cbc = Class.forName("com.nokia.example.picasa.s40.CategoryBarHandler");
	CategoryBarHandler.setMidlet(PicasaViewer.this);
	categoryBarHandler = (CategoryBarHandler) cbc.newInstance();
	refreshCommand = (Command) Class.forName("com.nokia.example.picasa.s40.UpdateIconCommand").newInstance();
} catch (Throwable t) {
	//#debug
	Log.i("Cannot set category bar handler", "normal before SDK 2.0");
}
To safely use a class that is unsupported on some devices, the pattern is to:
Query for the interface using one of the methods described in previous sections (system properties is most common).
Use a wrapper class to handle the functionality of the interface, if it is supported. You can also invoke a class indirectly and catch the error, if it is not available on the phone.
In the next example, we have a class that paints a list to which we add gesture-controlled scrolling, if supported by the device:
final String s = System.getProperty("com.nokia.mid.ui.version");
final boolean gesturesUsed = s != null && (s.equals("1.1b") || s.equals("1.1c") || 1.1 < Float.parseFloat(s.substring(0, 2)));

// Check support for Gestures and FrameAnimator
if (gesturesUsed) {
  GestureProvider.enableGestures(this);
}
The wrapper class would look like this:
public class GestureProvider
    implements GestureListener, FrameAnimatorListener {

...

    public static void enableGestures(ListCanvas canvas) {
        if (!created) {
            new GestureProvider(canvas);
        }
    }

...

    public void gestureAction(Object container,
        GestureInteractiveZone gestureZone, GestureEvent event) {
        List currentList = canvas.getCurrentList();
        int startY = event.getStartY();

        switch (event.getType()) {
            case GestureInteractiveZone.GESTURE_DRAG:
                animator.drag(event.getDragDistanceX(),
                    -canvas.getCurrentList().getY() + event.getDragDistanceY());
                break;
            case GestureInteractiveZone.GESTURE_FLICK:
                animator.kineticScroll(event.getFlickSpeed(),
                    FrameAnimator.FRAME_ANIMATOR_FREE_ANGLE,
                    FrameAnimator.FRAME_ANIMATOR_FRICTION_MEDIUM, event.getFlickDirection());
                break;
            case GestureInteractiveZone.GESTURE_TAP:
                // Check which item is tapped
                for (int i = 0; i < currentList.getListItems().size(); i++) {
                    ListItem listItem = ((ListItem) currentList.getListItems().elementAt(i));
                    if (listItem.enclosesY(startY)) {
                        listItem.onClick();
                    }
                }
                break;
        }
    }

...

    public void animate(FrameAnimator animator, int x, int y, short delta,
        short deltaX,
        short deltaY, boolean lastFrame) {
        // Tell canvas about the changed y coordinate
        canvas.getCurrentList().setY(-y);
    }
An example MIDlet using this technique:
Paint example has a wrapper for the Nokia Multipoint Touch API. The wrapper uses indirect reference to check the existence of needed classes and works as an intermediary between the actual multipoint touch interfaces and the rest of the application. If Nokia Multipoint Touch API is missing, the wrapper will handle the situation gracefully.
Make sure classes do not get removed in obfuscation
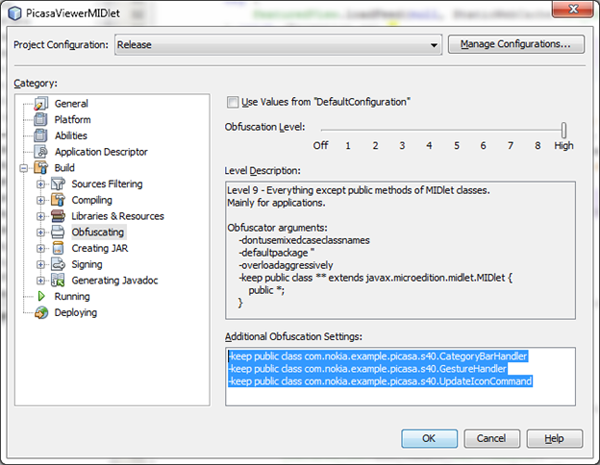
Note that
when you create a release build, some classes such as delegates which
you access only with a Class.forName() construct, might be removed
by the obfuscator. You can ensure that this does not happen by adding
these class names to the Proguard exclude list using keep
public class statement as shown in the picture.

Throw actions forward on the UI thread
All modern user interfaces
including Series 40 have a single UI thread. User input events such
as touch, and system actions such as Canvas.paint(), are processed on a single thread. This UI thread is fed by an event
queue, and you may use this to ensure that your action is processed
after other pending events.
In the following example, we set
the Canvas during MIDlet startup, and only after
the Canvas is current and displayed, we continue
to setup the CategoryBar because CategoryBar
ImageIcon initialisation requires the screen to be already
initialised.
public void startApp() {
   ..
   Display.getDisplay(this).setCurrent(featuredView);
   PlatformUtils.runOnUiThread(new Runnable() {
      public void run() {
         try {
             final Class cbc = Class.forName("com.nokia.example.picasa.s40.CategoryBarHandler");
             CategoryBarHandler.setMidlet(PicasaViewer.this);
             categoryBarHandler = (CategoryBarHandler)  cbc.newInstance();
         } catch (Throwable e) {
         }
	..