Adaptive design best practices
An application practising adaptive design will modify its look and behavior automatically according to the phone it is running on. This notion is often discussed with JavaScript-based HTML applications, but the principle is equally applicable to your mobile application designs. The trick is to adapt based on specific properties of the phone, not the name of the phone. Then your design is much more forward compatible with the future Series 40 and Nokia Asha software platform devices.
Use Canvas and a simple painter
The Canvas-based interfaces are simpler to code, as they redraw the entire
screen each time in a stateless manner.
CustomItem on Form is easier than Canvas
The easiest way to create
a user interface for multiple Series 40 phones is to use Form. The high level UI constructs on Form, automatically adapt
to layout changes (caused by, for example, a virtual keyboard or the
different orientations). This can save you a significant amount of
time.
Form UIs are however not as easily tailored
visually as Canvas, therefore most professional MIDlets
are designed on a Canvas. The newer full touch devices
are very attractive and usable with Form. So if new
devices are the primary target, this can be a great choice. Be sure
to keep your Form UI in a simple single column vertical
flow layout. More complex layout pointers – like “newline after item”
– behave differently on different phones, so they are not reliable
for multi-phone adaptive design.
When you need to create a more
complex or pixel perfect section of your UI, use the CustomItem class. This allows you to paint() just like a Canvas, but only for that section of the screen that really
needs a custom painter. CustomItem painters tend
to be simpler and easier to maintain than full Canvas painters since the code is tightly encapsulated and modular. Although
a Form automatically gives you a vertical scrollbar
when needed, you unfortunately do not have explicit control of, or
code visibility of, the current scroll position as you do with Canvas.
An example app using this technique:
WeatherApp MIDlet uses a custom UI component for displaying the list of cities in the city search dialog. The component is implemented as CustomItems on Form.
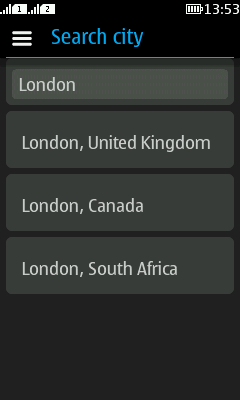
Figure: WeatherApp city search dialog
Paint the focus only on non-touch devices
Form UIs are particularly recommended if you are supporting keyboard
navigation. The addition of keyboard navigation complicates the Canvas UI and scrolling logic, but this behavior is automatic
with Item components on a Form.
If you are adding CustomItem components to a Form that supports keyboard phones, or handling keyboard
input on a Canvas, be sure to alter the painter colours
and possibly other attributes for the currently focused item. CustomItem components can easily keep track of whether they
are focused using traverseIn() and traverseOut() methods. An example of this technique supporting all recent Series
40 and Nokia Asha software platform devices with the painter only
painting the focus on non-touch phones can be found in Episode 3: CustomItem with Forms.
Layout for both portrait and landscape orientations
Series 40 full touch and Nokia Asha software platform devices have accelerometers to detect the current screen orientation. By default, the application will be portrait only. This chapter tells how you can safely add orientation support without breaking backward compatibility.
First, set orientation change support to the JAD manifest. You can do this in the project settings as shown in the example below.
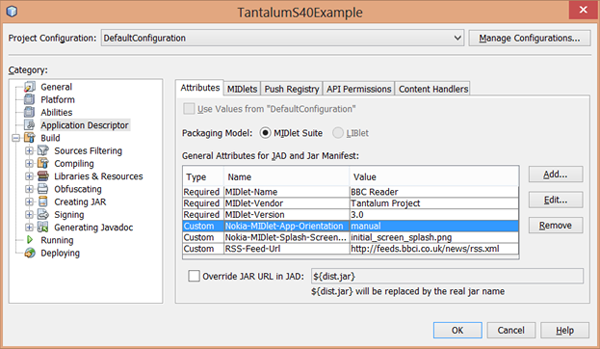
Then you need to add an optional class which will handle
orientation changes for your Canvas. The newInstance() construct will throw a runtime Error on phones which do not support orientation changes, but this error
can be safely caught and handled.
try {            Class.forName("com.nokia.s40rssreader.Orientator").newInstance();
} catch (Throwable t) {
	//#debug
	Log.e("Orientation changes not supported", "", t);
}
This will create and register the following orientation handler:
public class Orientator implements OrientationListener {
    public Orientator() {
        Orientation.addOrientationListener(this);
    }

    public void displayOrientationChanged(final int newDisplayOrientation) {
        switch (newDisplayOrientation) {

            case Orientation.ORIENTATION_LANDSCAPE:
                Orientation.setAppOrientation(Orientation.ORIENTATION_LANDSCAPE);
                break;

            case Orientation.ORIENTATION_PORTRAIT:
            default:
                Orientation.setAppOrientation(Orientation.ORIENTATION_PORTRAIT);
        }
    }
}
If needed, you can insert additional logic tests that are appropriate for your application to prevent orientation changes in certain states. The app orientation is “manual” to allow you to finely control the entire process.
Note that although constants ORIENTATION_PORTRAIT_180 and ORIENTATION_LANDSCAPE_180 are defined, they are not supported by any phones as of Nokia SDK
2.0 and should not be used. Although your code can be safely forward
compatible in detecting these orientations in the above switch statement, you will get a runtime exception if you attempt to setAppOrientation() to a value not supported by the phone.
Based on the orientation, you can and in some cases should adapt the layout for best use of screen real estate in portrait and landscape orientations. In the example below, we automatically adapt the spacing to a 4 column layout in landscape, but use a 3 column layout when in the portrait orientation. In both cases, the image has been resized from the original size to automatically adapt to the current phone’s screen size.
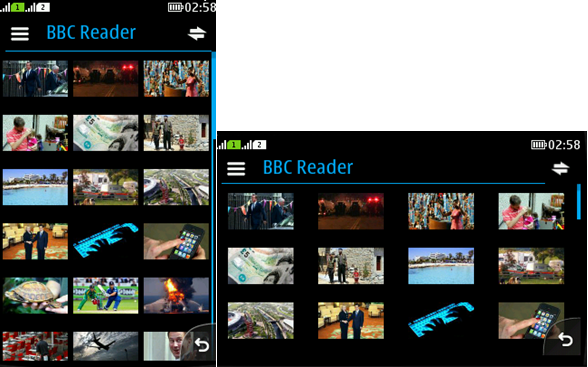
You can also use these different layouts on the various phones that do not support orientation changes, but which do have 320 x 240 and 240 x 320 screens that are fixed to either portrait or landscape layouts.
Example MIDlets using this technique:
The complete source code for the aforementioned “Series 40 BBC Reader” example can be downloaded from here.
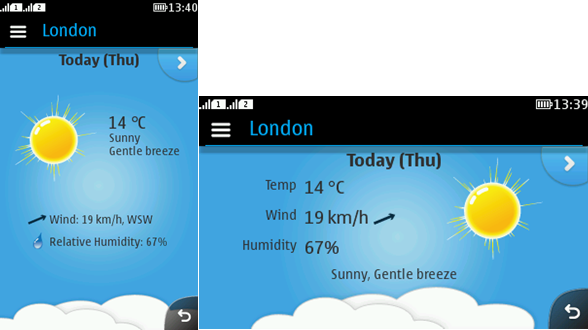
There is also another good application, WeatherApp, that uses the Orientation API to detect the device orientation and adjusts its UI orientation accordingly.
Scale by screen width at runtime
The size of images should be
adjusted automatically based on the current screen width. Often image
height is free of constraints due to vertical scrolling. The example
code below measures the screen width as the Canvas is created. These values are then used to request appropriately
sized images from the web service, and the results which are not exactly
as desired are further resized in the phone before presentation so
that they are exactly half a screen wide.
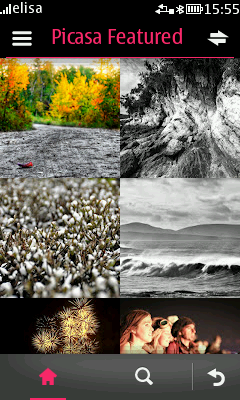
public ImageGridCanvas(final PicasaViewer midlet) {
	super(midlet);

	this.setTitle("ImageGridCanvas");
	imageSide = getWidth() / 2;
	headerHeight = 0;
	XC = imageSide;
	YC = getHeight() / 2;
	angle = 0;
}
An example app using this technique:
WeatherApp contains two sets of image resources: “high” and “low”. The sets are optimized for different screen sizes, “high” for high resolution screens and “low” for low resolution screens. Both sets are packaged in the Jar file. The application selects the image set in runtime by examining the screen width.

Scale images at runtime
Ideally images arrive from the network or camera in exactly the right size for your screen on every device. In practice, not all web services offer automatic scaling, so you often need to request an image size which is slightly larger than the adaptive layout screen block into which you want to fit the image. The phone must then shrink the image at runtime to exactly fit into the available space.
The example below shows how Picasa Viewer application does this. First, it checks the size of the phone screen, then it maps that to a size available from the web service, and finally it uses automatic image resizing to adapt the images as they are loaded for use either from local flash memory storage or directly over the network.
/**
 * Initialise the storage. The width is the width of the screen. This is
 * used to determine how large images should be.
 *
 */
public static synchronized void init(final int width) {
	if (feedCache == null) {
		screenWidth = width;
		if (screenWidth < 256) {
			imageSide = 128; //Must be supported picasa thumb size
			imageCache = new StaticWebCache('4', new ImageTypeHandler(screenWidth));
			imageSize = 288; //Image max size to get suitable sized images from picasa
		} else {
			imageCache = new StaticWebCache('4', new ImageTypeHandler());
			imageSize = 720; //Picasa size for "fullsize" images
		}

		feedCache = new StaticWebCache('5', new ImageObjectTypeHandler());

		thumbSize = imageSide + "c"; // c is for cropped, ensures image proportions

		urlOptions = "?alt=json&kind=photo&max-results=" + NR_OF_FEATURED + "&thumbsize=" + thumbSize
				+ "&fields=entry(title,author(name),updated,media:group)&imgmax=" + imageSize;
		featURL = "http://picasaweb.google.com/data/feed/base/featured" + urlOptions;
		searchURL = "http://picasaweb.google.com/data/feed/base/all" + urlOptions + "&q=";
	}
}
Helper class for creating an image class. Nokia Asha software platform devices can use the Image Scaling API to resize the images.
/**
 * This is a helper class for creating an image class. It automatically converts
 * the byte[] to an Image as the data is loaded from the network or cache.
 *
 * @author tsaa
 */
public final class ImageTypeHandler implements DataTypeHandler {
    private int imageWidth;

    public ImageTypeHandler() {
        imageWidth = -1;
    }

    public ImageTypeHandler(final int width) {
        imageWidth = width;
    }

    public Object convertToUseForm(final byte[] bytes) {
        try {
            if (imageWidth == -1) {
                return Image.createImage(bytes, 0, bytes.length);
            } else {
                Image temp = Image.createImage(bytes, 0, bytes.length);
                final int w = temp.getWidth();
                final int h = temp.getHeight();
                int[] data = new int[w*h];
                temp.getRGB(data, 0, w, 0, 0, w, h);
                temp = null;
                final Image img = ImageUtils.downscaleImage(data, w, h, imageWidth, imageWidth, true, true, true);
                data = null;

                return img;
            }
        } catch (IllegalArgumentException e) {
            //#debug
            Log.e("Exception converting bytes to image", bytes == null ? "" : "" + bytes.length, e);
            throw e;
        }
    }
}
Stamp text on graphics at runtime
One simple form of procedural graphics that helps with localisation and reduces the number of static images which your graphics artist must create is to start from graphics which do not have any text on them. You can then stamp the text onto the image at runtime, generating attractive buttons and other artwork on-the-fly, in the current language.
This technique is best used for short text, or when many small graphics items must be created. A variant on this approach is to turn every item in the scrolling list into an individual graphics item for fast scroll rendering. Text and image lines can be combined into an image which is generated to be the exact width of the current screen.
The following example is taken from an alternate renderer in the BBC Reader Series 40 example.
/**
 * View for rendering list of RSS items
 *
 * @author ssaa
 */
public final class VerticalListView extends RSSListView {
..
    public void render(final Graphics g, final int width, final int height) {
..
            for (int i = startIndex; i < modelCopy.length; i++) {
                if (curY > -ROW_HEIGHT) {
                    Image itemImage = (Image) this.renderCache.get(modelCopy[i]);

                    if (itemImage == null) {
                        itemImage = createItemImage(modelCopy[i], width, i == selectedIndex);
                    }
                    g.drawImage(itemImage, 0, curY, Graphics.TOP | Graphics.LEFT);
                } else {
                    // Reduce load on the garbage collector when scrolling
                    renderCache.remove(modelCopy[i]);
                }
                curY += ROW_HEIGHT;

                //stop rendering below the screen
                if (curY > height) {
                    break;
                }
            }
Animate icons to indicate action
Users have got used to see animations while waiting – most frequently while waiting for a network response. An animation is more attractive than a popup, and it gives a smooth user experience to indicate action.
The traditional alternative
is a more visually jarring pop-up which the user may need to click
to dismiss. The example below illustrates how animated icons can be
displayed with Series 40 full touch devices. Nokia Asha software platform
devices do not display icons on IconCommands. The
icons can be animated on Canvas, GameCanvas and Form user interfaces.
Timer.scheduleAtFixedRate() will generally give a smoother animation than Timer.schedule() or a separate Thread, unless the separate Thread has relatively complex rendered logic to smooth out
multi-thread and garbage collection-induced animation rate jitter.
Be sure to keep the requested animation rate below the maximum sustainable
rate on the slowest phone you need to support, or the Timer will run flat out and still lag.
public class UpdateIconCommand extends IconCommand {
    static Image image = null;
    private Graphics g;
    private Timer animationTimer;
    private double angle;
    private int startDot;
    private static final int WIDTH = 36;
    private static final int HEIGHT = 36;
    private static final double XC = WIDTH / 2.0;
    private static final double YC = HEIGHT / 2.0;
    private static final double R = 10;
    private static final int[] shades = {0x000000, 0xffffff, 0xdddddd, 0xbbbbbb, 0x999999, 0x777777, 0x333333};
    private static final int dots = shades.length;
    private static final double step = (2 * Math.PI) / dots;
    private static final double circle = (2 * Math.PI);
    private static Image iconImage = DirectUtils.createImage(WIDTH, HEIGHT, 0xffffff);

    static {
        try {
            image = Image.createImage("/connect.png");
        } catch (Exception e) {
            //#debug
            Log.l.log("Cannot initialize", "Update icon image", e);
        }
    }

    public UpdateIconCommand() {
        super("Update", "Update article list", iconImage, iconImage, Command.OK, 0);

        angle = 0.0;
        startDot = 0;
        g = iconImage.getGraphics();
        g.drawImage(image, (int) XC, (int) YC, Graphics.HCENTER | Graphics.VCENTER);
    }

    public void startAnimation() {
        if (animationTimer == null) {
            g.setColor(0xff000000);
            g.fillRect(0, 0, WIDTH, HEIGHT);
            animationTimer = new Timer();
            animationTimer.schedule(new TimerTask() {

                public void run() {
                    drawSpinner();
                }
            }, 0, 100);
        }
    }

    public void stopAnimation() {
        if (animationTimer != null) {
            animationTimer.cancel();
            animationTimer = null;
            g.setColor(0x000000);
            g.fillRect(0, 0, WIDTH, HEIGHT);
            g.drawImage(image, (int) XC, (int) YC, Graphics.HCENTER | Graphics.VCENTER);

            // Force the screen to repaint completely, including the no-longer-animated icon
            Orientation.setAppOrientation(Orientation.getAppOrientation());
        }
    }

    public void drawSpinner() {
        for (int i = 0; i < dots; i++) {
            int x = (int) (XC + R * Math.cos(angle));
            int y = (int) (YC + R * Math.sin(angle));
            g.setColor(shades[(i + startDot) % dots]);
            g.fillRoundRect(x, y, 6, 6, 3, 3);
            angle = (angle - step) % circle;
        }
        startDot++;
        startDot = startDot % dots;

        // Force the screen to repaint completely, including the animated icon
        Orientation.setAppOrientation(Orientation.getAppOrientation());
    }
}
If you wish to create a similar animation effect on
a Form user interface prior to Nokia SDK 2.0, you
will need an alternative implementation such as the one found in the Picasa Viewer example. You can easily repaint a Canvas component periodically to generate the animation. For smooth animation
of a button on a Form with Nokia SDK 1.1 for Java
and earlier, you should create a CustomItem which
acts as a button.
An example app using this technique:
TouristAttractions MIDlet has a splash screen with a spinning plane icon indicating progress. In this case, the animation uses its own thread instead of a timer to schedule the drawing.

Use the current Series 40 theme colours
Using the phone’s current
theme colours, enables developers to better match the look of the
user’s device. High-level UI components are themed automatically.
To apply colours to Canvas and CustomItem components, you query the phone and set the MIDlet colours you will
use for painting your objects.
Example of custom MIDlet theme on non-touch devices:
public Colors(Display display) {
        if (isTouch()) {
            this.background_hilight = display.getColor(Display.COLOR_HIGHLIGHTED_BACKGROUND);
            this.background = display.getColor(Display.COLOR_BACKGROUND);
            this.foreground = display.getColor(Display.COLOR_FOREGROUND);
            this.foreground_hilight = display.getColor(Display.COLOR_HIGHLIGHTED_FOREGROUND);
            this.border = display.getColor(Display.COLOR_BORDER);
            this.border_hilight = display.getColor(Display.COLOR_HIGHLIGHTED_BORDER);
        } else {
            this.background_hilight = 0x444444;
            this.background = 0x000000;
            this.foreground = 0xeeeeee;
            this.foreground_hilight = 0xffffff;
            this.border = 0xeeeeee;
            this.border_hilight = 0xffffff;
        }
    }

   private boolean isTouch() {
        try {
            //Try to produce an exception
            Class.forName("com.nokia.mid.ui.gestures.GestureEvent");
            return true;
        } catch (Throwable t) {
            return false;
        }
    }
An example app using this technique:
RLinks example uses system theme colours to provide seamless experience for the user.
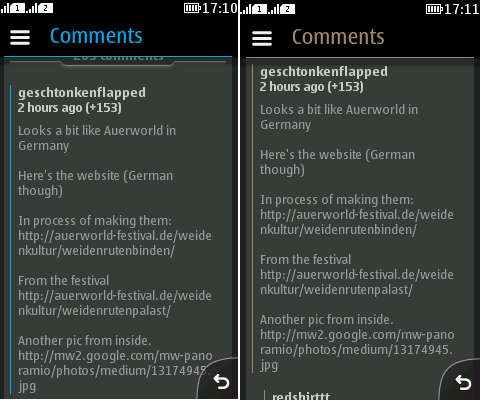
Note: Nokia Asha software platform devices do not support multiple themes.