Implementation
Picasa Viewer version 1.1 consists of three views that are initialized on application launch:
try {
            // Initialize views
            displayables[FEATURED_VIEW_INDEX] = new FeaturedCanvas(this);
            displayables[SEARCH_VIEW_INDEX] = new SearchCanvas(this);
            displayables[DETAILS_VIEW_INDEX] = new DetailCanvas(this);
        }
        catch(Exception e) {
            L.e("Could not initialize views.", "Shutting down.", e);
            picasaViewer.notifyDestroyed();
        }
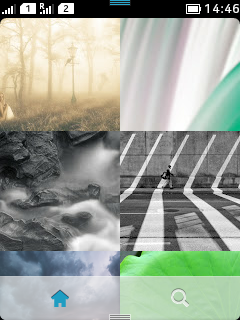
FeaturedCanvas is the Grid view that displays feature images. This view is selected by default on application launch.

Figure: FeatureCanvas View
Searching and retrieving images
The SearchCanvas view can be selected from the custom semi transparent CategoryBar at the bottom of the screen. The SearchCanvas view is empty when selected for the first time and displays a search field. For more information on creating a custom search field, see Creating LCDUI Custom Components: SearchBar.
Searching for a certain term, retrieves the term as a String from the search field and gets ImageObject from the PicasaStorage. The PicasaStorage contains information about the resolution of the display and the maximum allowed sizes for images. It also defines the URLs for performing a search request or a retrieval of featured images:
screenWidth = width;

            if (screenWidth < 256) {
                imageSide = 128; // Must be supported picasa thumb size
                imageSize = 288; // Image max size to get suitable sized images from picasa
            }
            else {
                imageSide = 256; // Must be supported thumb size in picasa
                imageSize = 720; // Picasa size for "fullsize" images
            }

            imageCacheView.setMaxSize(width, width);
	….
          featURL =
                    "http://picasaweb.google.com/data/feed/base/featured" +
                    urlOptions;

            searchURL =
                    "http://picasaweb.google.com/data/feed/base/all" +
                    urlOptions +
                    "&q=";
Besides the search term, getting ImageObjects from the PicasaStorage requires that we define a priority. We also need to specify a type, i.e. whether the retrieval should occur over the internet or the local cache (previously retrieved images).
public static Task getImageObjects(final String search,
                                       final int getPriority,
                                       final int getType,
                                       final Task callback)
    {
        final String url = search != null ? searchURL + search : featURL;
        return feedCache.getAsync(url, getPriority, getType, callback);
    }
The retrieved images are displayed in a similar grid-like manner. Switching between the FeaturedCanvas and back to the SearchCanvas view, will not launch the virtual keyboard but will display the search field along with the previously fetched images from the local cache.

Figure: First time the SearchCanvas is launched (left), and the same view (right) after having searched for a term
Tapping on any of the images, activates the DetailCanvas view which displays the selected image in full screen along with some metadata information.

Figure: DetailCanvas view
Transparent CategoryBar
Given that the native CategoryBar’s opacity is non customizable, a custom CategoryBar was created that extends the native one and uses its own renderer:
private CustomCategoryBar(Canvas canvas,
                              Image[] unselectedIcons,
                              Image[] selectedIcons,
                              String[] labels)
    {
        super(unselectedIcons, selectedIcons, labels, CategoryBar.ELEMENT_MODE_STAY_SELECTED);
        _canvas = canvas;
        _tabCount = unselectedIcons.length;
        _renderer = new CustomCategoryBarRenderer(WIDTH, HEIGHT, unselectedIcons, selectedIcons);
    }
The CustomCategoryBarRenderer applies the custom opacity to a number of image assets:
private void createAndTakeInUseTranslucentImages() {
            final float opacity = _setOpacity;
            final int alpha = (int)(255 * opacity);

            if (_translucentImages == null) {
                _translucentImages = new Image[_opaqueImages.length];
                _translucentIcons = new Image[_unselectedIcons.length];
            }

            new Thread() {
                public void run() {
                    for (int i = 0; i < _opaqueImages.length; ++i) {
                        _translucentImages[i] = ImageUtils.setAlpha(_opaqueImages[i], alpha);
                    }

                    for (int i = 0; i < _unselectedIcons.length; ++i) {
                        _translucentIcons[i] = ImageUtils.setAlpha(_unselectedIcons[i], alpha);
                    }

                    _currentImages = _translucentImages;
                    _currentIcons = _translucentIcons;
                    _storedOpacity = opacity;
                    repaint();
                }
            }.start();
        }
These image assets consist of:
-
The left corner of a unselected tab on left-most side of the view.
-
One pixel wide texture of a unselected tab.
-
The right corner of a unselected tab on right-most side of the view.
-
The left corner of a selected tab on left-most side of the view.
-
The left corner of a selected tab
-
One pixel wide texture of a selected tab.
-
The right corner of a selected tab.
-
The right corner of a selected tab on right-most side of the view.
There is a separate method that sets the alpha value for each pixel for each asset as follows:
public static Image setAlpha(final Image image, final int alpha)
       throws NullPointerException, IllegalArgumentException
    {
        if (image == null) {
            throw new NullPointerException();
        }

        if (alpha < 0 || alpha > 255) {
            throw new IllegalArgumentException();
        }

        final int width = image.getWidth();
        final int height = image.getHeight();
        final int[] originalRgb = new int[width * height];
        image.getRGB(originalRgb, 0, width, 0, 0, width, height);

        final int opaqueRgb[] = new int[width * height];

        for (int x = 0; x < width; ++x) {
            for (int y = 0; y < height; ++y) {
                if (originalRgb[(width * y) + x] >>> 24 == 255) {
                    opaqueRgb[(width * y) + x] =
                        originalRgb[(width * y) + x] + (alpha << 24);
                }
                else {
                    opaqueRgb[(width * y) + x] = originalRgb[(width * y) + x];
                }
            }
        }

        return Image.createRGBImage(opaqueRgb, width, height, true);
    }
For more information on creating a custom CategoryBar see Creating LCDUI Custom Components: CategoryBar.
For information about the design and functionality of the MIDlet, see Design.