Localisation (L10N)
Resource bundles support localisation resources, allowing the developer to store key-value pairs within the resource file. The localisation bundles use the format of Java property files, which only support USASCII characters. To enter characters in a different script, either use a special editor (such as NetBeans), or use the native2ascii JDK tool with the Ant task to convert the file.
To create a resource bundle, use the following code:
<build dest="src/myresourceFile.res">
    <l10n name="localize">
        <locale name="en" file="l10n/localize.properties" />
        <locale name="iw" file="l10n/localize_iw_IL.properties" />
    </l10n>
</build>
To load the localisation resource, use the following syntax:
Hashtable h = bundle.getL10N("localize", "en");
The hashtable contains the key-value pairs of the resources within the bundle, allowing for easy localisation. LWUIT supports automatic localisation through the UIManager.setResourceBundle(Hashtable) method. This installs a global resource bundle which is “checked” whenever a localisable resource is created, thus allowing for the replacement of the entire UI language without querying the resource bundle manually.
Managing localisation in Resource Editor
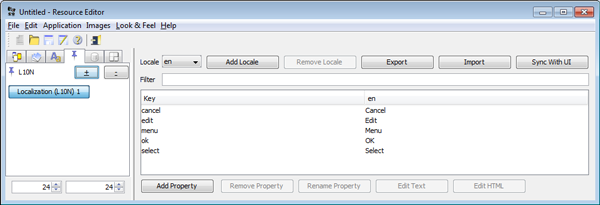
In Resource Editor, a localisation resource can be edited by assigning key/value pairs to use within the application. A key can be mapped to a resource name in any locale.
The editor allows you to add or remove locales listed in the combo box above and appropriately edit the locale entries in the table below. To add or remove a locale property, use the buttons on the bottom of the screen.

Figure: Localisation and internationalisation view in Resource Editor
Using automatic localisation
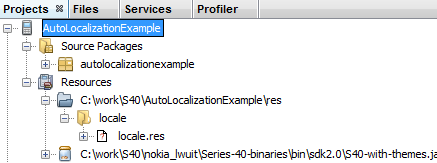
In LWUIT for Series 40, you can automatically get the correct localisation loaded based on the device locale. To have LWUIT automatically load the localisation you must create a locale.res resource file, create a "locale" directory inside your app, and then put the resource file into that directory. When you create the localisation in ResourceEditor, give it a name "locale". When LWUIT is initialised, it will try to load this file automatically by querying the device locale and then tries to set the current localisation based on it.
The following figure demonstrates how a project structure looks like when the locale.res file is added with the correct locale folder.

Figure: Project structure showing the localisation resource file
You can download an example project that has a simple localisation file added to demonstrate the feature.
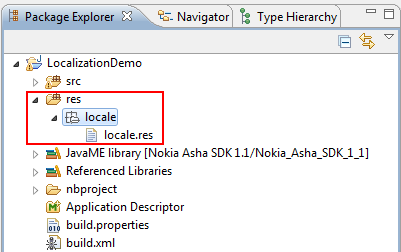
In LWUIT for Nokia Asha software platform, you can automatically get the correct localisation loaded based on the device locale. To have LWUIT automatically load the localisation, you must add the following folder containing the locale.res file to your app’s res folder:
<Asha SDK Installation path>\Nokia\Devices\Nokia_Asha_SDK_1_1\plugins\lwuit\extra\asha-sdk\locale
The following figure demonstrates how your app’s project structure looks like when the locale.res file is added to your app’s res\locale folder:

Figure: Automatic localisation on LWUIT for Nokia Asha software platform
Also, you can add your own localisation key-value pairs to the locale.res file. Ensure that you don’t change any existing localisation key-value pairs in the locale.res file.
For more information, you can refer to the LocalizationDemo example in the following path:
<Asha SDK Installation path>\Nokia\Devices\Nokia_Asha_SDK_1_1\plugins\lwuit\examples\LocalizationDemo