Pass-Through view
The image conversion process from SVG to SVGT is controlled by criteria defined in the pass-through file. The default pass-through file contains namespaces, elements and attributes allowed as per SVGT specification. Pass-through files can be viewed, created and edited in the Pass-Through view.
Menu options
The menu bar options in the Pass-Through view are the following:
File
New - Opens default a new pass-through window.
Open - Opens a dialog for selecting a new pass-through file (
.xml) file.Configuration - Switches to the Configuration view.
Save - Saves the current pass-through file configuration (see Saving and opening a pass-through file)
Save As - Saves the current pass-through file configuration with a new name.
Exit - Closes the SVG to SVGT Converter.
Tools
Converter - Starts the conversion from SVG to SVGT (disabled in the Pass-Through view).
Help
Contents - Opens the SVG to SVGT Converter help
About - Provides information about the SVG to SVGT Converter.
Pass-through table
The pass-through table fields are used for defining the pass-through file attributes:
Namespace
Element
Attribute
Value
A value is associated with an attribute, which in turn belongs to an element. Both an element and attribute belong to some namespace supported by the SVG.
You can add new rows to the table or edit the values of a selected row by using the Add and Edit buttons. You can remove selected rows by clicking the Remove button.
Add
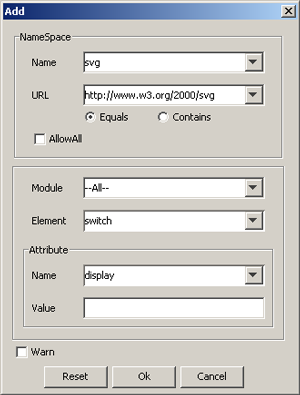
Clicking the Add or Edit button opens the Add dialog:
The options provided in the Add dialog are the following:
Note: The options provided in the Add dialog are also provided in the Edit dialog.
Name - Defines the name of the namespace.
URL - Defines the corresponding URL for the namespace defined in the Name field.
Equals, Contains radio buttons - Specifies whether the specified URL in the URL field is an exact URL or a part of a URL.
AllowAll checkbox - Specifies whether all the element and attributes defined in the Namespace fields are allowed or not. Notice, that if this checkbox is selected, the Module, Element, Attribute and Value fields are disabled.
Module - Defines all the modules that are supported in the SVG specification. When --All-- is selected, the Element drop-down list provides all modules. If a specific module is selected, only the corresponding elements are provided in the Element drop-down list.
Element - Defines the elements that are supported in a specific SVG module specification (defined in the Module field).
Attribute - Defines the attributes that are supported in a specific SVG element specification (defined in the Element field).
Value - Defines the value of the attribute (entered manually)
Warn checkbox - Specifies whether a warning needs to be raised. If only the Namespace data has been specified, a warning is raised for the elements or attributes corresponding to this namespace. If element names are specified, a warning is raised for the specified elements referred to with the specified namespace. If attribute names are specified, a warning is raised for the specified attributes referred to in the specified namespace.
Reset - Clears all fields.
Ok - Saves all values entered into the fields.
Cancel - Exits the Add dialog without saving the values entered into the fields.

