Working with Carbide.c++
Note: The instructions provided here provide an overview of the most important Carbide.c++ features that you need when using this IDE with the SDK. For more detailed information and instruction, please refer to the IDE's own documentation by selecting Help > Help Contents from the Carbide.c++ menu bar.
Creating a project
Carbide.c++ provides a number of different ways in which to get started with application development.
Creating a new project
Use the New Project Wizard to create a new C++ application for S60. Creating a new project with the New Project Wizard is a convenient way to get started with S60 application development. The wizard provides various different project templates from which to choose from and guides you step by step in creating a new project based on the selected template. Once you have selected the appropriate template and entered the needed project information in the dialogs, the wizard creates all the needed project files and directories, enabling you to start working on it in the Carbide.c++ workbench.
Importing a project
The Import Project Wizard allows you to import Symbian OS projects.
You may wish to use this approach if you have existing Symbian OS projects
and now wish to move to development in Eclipse. The wizard allows you to import
both component description file (bld.inf) and project
definition file (.mmp) based projects.
For more information on creating and importing projects in Carbide.c++, please refer to the following topics in the Carbide.c++ Help:
Carbide.c++ User Guide > Getting Started > First Application Example > 2. Creating a Symbian OS Program
C/C++ Development User Guide > Tasks > Creating a project
Working with a project
Once you have created or imported a project you can start working on it in the Carbide.c++ workbench. The Carbide.c++ workbench (that is, the desktop development environment) provides the following views:
An explorer window, which displays the various components of the software.
An editor window, in which you can edit the source code.
An outline window, which displays the software being worked on.
An output window, which displays the output from the various tools in use (such as compilers).
In the figure above a skeleton HelloWorld project has been created with
the New Project Wizard. This is a working application, which the user
can edit personalize to create a new application. This would include, for
example, editing the source files in the /src folder in order to implement
the project. The included files in the /inc file (including .h and .hrh files)
may also need to be edited, depending on what kind of an application is being
created. All editing of files can be done in the full-featured editor, which
provides standard text-editing functionality.
Notice, that all the windows in the workbench can be resized (maximized and hidden) freely and rearranged according to your needs. You can also save different layouts in configurations called perspectives and you can switch between different perspectives by clicking the perspective button on the right side of the menubar). A preconfigured debugging perspective allows you to examine code through windows displaying stack traces, variable values and other debugging information.
For more information on working on a project in Carbide.c++, please refer to the following topics in the Carbide.c++ Help:
Carbide.c++ User Guide > Getting Started > First Application Example
C/C++ Development User Guide > Tasks > Working with C/C++ project files
Building a project for the Nokia N97 emulator
The Nokia N97 emulator simulates a real Nokia N97 device. You can use the emulator to test your application on your PC. In order to be able to view an application in the emulator you need to create a WINSCW debug build of it. Notice, that you cannot install this build onto a real Nokia N97 device; for this you will need to create a GCCE (or ARMV5) release build.
To create a WINSCW build of a project in Carbide.c++ in order to be able to view it on the SDK emulator, do the following:
Select Project > Properties from the menu bar.
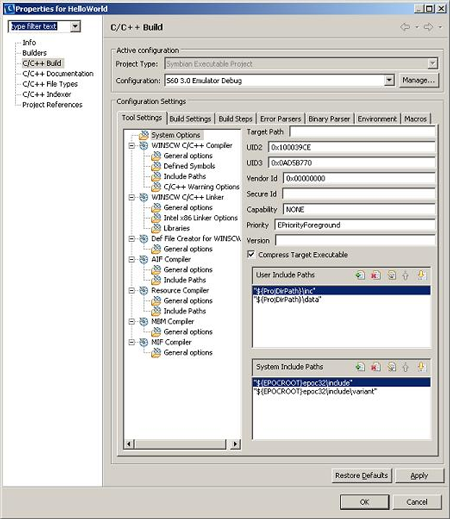
The Properties dialog opens:
The Properties dialog allows you to manage the build process; you can define all aspects of the build by entering the needed information here.
Click C/C++ Build in the dialog TOC.
Select "S60 3.0 Emulator Debug" from the Configuration drop-down menu.
Click OK.
Select Project > Build Project from the menu bar.
Carbide.c++ creates a build of your project according to the current configuration determined in the Properties dialog - in this case, a WINSCW build.
For more information on building a project, please refer to the following topics in the Carbide.c++ Help:
Carbide.c++ User Guide > Getting Started > First Application Example > 5. Building a Symbian OS Executable
C/C++ Development User Guide > Tasks > Building projects
Running an application in the Nokia N97 emulator
Once you have created a GCCE build of your project, you can run it on the SDK emulator.
Select Run > Run... from the menu bar.
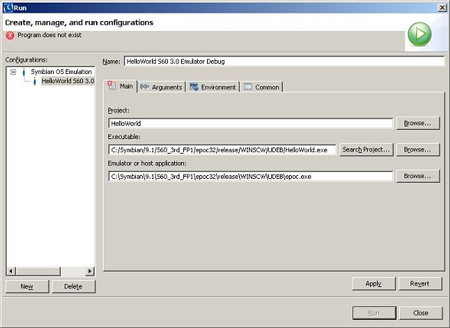
The Run dialog opens:
The Run dialog allows you to define the launch configuration of the build.
Select the GCCE build from the Configurations list of the dilaog.
Define and/or accept the values in the fields (above all, make sure that the Executable and Emulator or host application paths are correct).
Click the Apply button.
Click the Run button.
The application is launched in the emulator.
For more information on running projects and applications through Carbide.c++, please refer to the following topics in the Carbide.c++ Help:
Carbide.c++ User Guide > Getting Started > First Application Example > 3. Building a Symbian OS Executable
C/C++ Development User Guide > Tasks > First Application Example > Running and debugging projects
Debugging
You can debug your application by clicking the "bug" icon in the toolbar. Carbide.c++ provides a full-feature debugger, including stepwise execution, breakpoints, and variable-value watching.
For more information on running projects and applications through Carbide.c++, please refer to the following topics in the Carbide.c++ Help:
Carbide.c++ User Guide > Getting Started > First Application Example > 5. Debugging Programs
C/C++ Development User Guide > Tasks > First Application Example > Running and debugging projects
Building an application for a target device
In order to be able to install your application to a real Nokia N97 device you need to create a GCCE build of it. The process here is similar to building an application for the emulator, but in this case you need to specify a different configuration.
Select Project > Properties from the menu bar.
In the Properties dialog, click C/C++ Build in the dialog TOC.
Select "S60 3.0 GCCE UREL" from the Configuration drop-down menu.
Click OK.
Select Project > Build Project from the menu bar.
Carbide.c++ creates a build of your project according to the current
configuration determined in the Properties dialog - in this case, a
GCCE build - as well as the .sis file of this project,
which is needed for installing it to a real device.
Notice, that in S60 3rd Edition all applications need to be signed before installing them to a real Nokia N97 device. Please refer to Mandatory Signing of Applications for more information on this.
For more information on building a project and installing an application to real Nokia N97 device, please refer to the following topics in the Carbide.c++ Help:
Carbide.c++ User Guide > Getting Started > First Application Example > 5. Building a Symbian OS Executable
Carbide.c++ User Guide > Getting Started > First Application Example > 6. Deploying Programs
C/C++ Development User Guide > Tasks > Building projects


