Navigating on screens
Navigation is the foundation of a usable and accessible application. Users need to know where they are in the application at all times, even if they are interrupted and have to put the mobile device aside for a while. Minimize the time users have to spend on navigating through menus and options to get to the content.
For usability guidelines, see Navigation.
Note: The information in this topic does not apply to touch devices. On touch devices, users navigate by touching the controls with a stylus or finger.
Selecting a navigation mode
You can use one of the following navigation modes on mobile devices that have a five way navigation pad:
Cursor navigation
Tab navigation
None for customized navigation

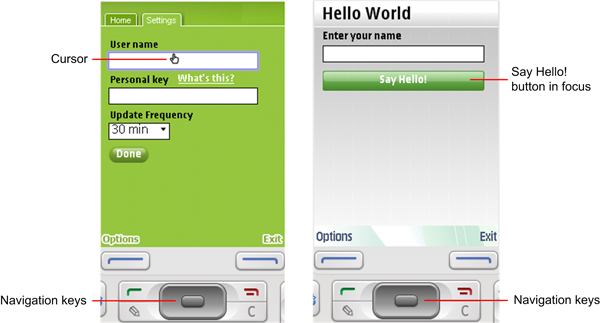
Figure: Cursor (left) and tab (right) navigation
In the figure, the widget on the left illustrates how users can navigate on the screen by clicking the navigation keys that move the cursor. The widget on the right illustrates how users can move the focus between the Say Hello! button and the Enter your name field by clicking the up and down navigation keys.
Note: Use tab navigation and softkeys as much as possible, because some users might find controlling the cursor with the navigation keys difficult.
For an example of using cursor and tab navigation modes and capturing key events, see the AccuWidget Example on Forum Nokia.
Using cursor navigation
In cursor navigation, users control the mouse pointer with the five way navigation pad. When users move the cursor inside the control's area on the screen, the cursor is said to be hovering . User graphical means to indicate hovering. Hovering is similar to focus, but it does not select a control for interaction until users press a selection key.
Using tab navigation
While mouse pointer mode is effective for navigating web pages, consider using key navigation for widgets. The simplest form of key navigation is tab navigation. Tab navigation is a special mode in S60 Web Runtime (WRT) widgets that turns off the mouse pointer, and enables users to navigate on screens and select controls using the five way navigation pad.
The downside of tab navigation mode is that the WRT engine controls the tab order. It uses a special algorithm to determine the next closest link to tab to. Tab navigation mode was primarily designed as a web browser feature to enable users to navigate simple vertical lists of links.
You can try tab navigation to see if it produces acceptable results. If not, you can revert to the simpler mouse pointer navigation, or develop a more sophisticated navigation mode by using custom navigation. Tab navigation allows you to collect navigation key events in your code. You can also implement custom navigation by enabling tab navigation and using HTML key events.
Customizing navigation
If you are an experienced JavaScript developer, you can capture and process key events to customize navigation. You can control the navigation and UI effects, such as highlighting, programmatically.
However, widgets that rely solely on key events for navigation and input do not work on devices that only support touch interfaces.
In general, browser engines display
key event codes in varying ways at JavaScript level. S60 WRT widget text and
input field components do not support all key events found in the other browser
or widget environments. Make sure that navigation elements appear on the screen
and that a JavaScript onClick handler is added to them.
An HTML anchor tag is one such example. You can also add onClick handlers
to a div element. The JavaScript onClick handler
JavaScript function can then activate the appropriate navigation option or
action.
To change navigation modes
There are two methods
of the widget object that you can use to change navigation
modes: setNavigationEnabled() and setNavigationType().
setNavigationEnabled() allows you to change the navigation mode
to tabbed or cursor.
setNavigationType() was introduced
in WRT 7.1 and allows you to change the navigation mode to tabbed, cursor,
or none. When set to none, the application must handle all events. WRT passes
all events to the application, including all key events for non-touch devices
and all events for touch devices.
To capture JavaScript key events
Attach key listeners.
Disable navigation mode to collect cursor key events.
Show key code and character code.
Create key events on pages.
For example:
<!DOCTYPE HTML PUBLIC "-//W3C//DTD HTML 4.01//EN" "http://www.w3.org/TR/html4/strict.dtd">
<html>
  <head>
    <script type="text/javascript">

      /*
       * attach key listeners
       */
      document.onkeypress = keyPress;
      document.onkeyup = keyUp;
      document.onkeydown = keyDown;

      /*
       * disable cursor navigation - otherwise cursor
       * key events are not received by keypress callbacks
       */
      widget.setNavigationEnabled(false);

      /*
       * show keyCode and charCode.
       */
      function keyPress(event) {
	document.getElementById('keypressField').innerHTML = event.keyCode + " / " +
event.charCode;
      }

      function keyDown(event) {
	document.getElementById('keydownField').innerHTML = event.keyCode + " / " +
event.charCode;
      }

      function keyUp(event) {
	document.getElementById('keyupField').innerHTML = event.keyCode + " / " +
event.charCode;
      }
    </script>

    </head>
  <body>
    keyCode / charCode:

    <div>
      KeyPress:
      <div id="keypressField"></div>
    </div>

    <div>
      Keydown:
      <div id="keydownField"></div>
    </div>

    <div>
      Keyup:
      <div id="keyupField"></div>
    </div>

  </body>
</html>