Using softkeys
Mobile devices provide limited input facilities for the user and controlling the mouse pointer may be difficult to some people. Therefore, it is recommended that you gather user input in your widget using the mobile device softkeys and an options menu instead of buttons and other such UI components on the screen.
Note: Consider localizing the softkey labels and menu items of your widget to support multiple languages.
Softkey defaults
By default:
-
The left softkey is mapped to the "Options" function, which invokes a list of menu items. The default label depends on the current used system language (Options for English).
-
The right softkey is mapped to the "Exit" function, which exits the widget. The default label depends on the current used system language (Exit for English).
WRT provides the ability to:
-
Hide/show the softkeys.
-
Change the label and function of the left or right softkeys. For example, depending on the state of the widget, you can map the right softkey to a "Cancel" or "Back" function to return to the previous view.
-
Create a custom options menu.
Note: You cannot create a custom options menu if you change the label of the left softkey.

Figure: Changing softkey defaults
To show softkeys
The control pane that shows the softkey labels is hidden by default in widgets. To manipulate the visibility of the labels:
Use the
showSoftkeys()method of the JavaScriptmenuobject to show softkey labels.Use the
hideSoftkeys()method to hide softkey labels.
If you rotate the widget screen, the location of the softkey labels changes relative to the other widget UI components. For more information on screen rotation, see Designing for dynamic screen orientation.
To set a function for the left softkey
Use the setLeftSoftkeyLabel() method of the JavaScript
menuobject to set a label and function for the softkey.Implement the function in your code.
Give the name of the function as a parameter to the
setLeftSoftkeyLabel()method.
To set a function for the right softkey
Use the
setRightSoftkeyLabel()method of the JavaScriptmenuobject to set a label and function for the softkey.Implement the function in your code.
Give the name of the function as a parameter to the
setRightSoftkeyLabel()method.
Creating an options menu
Note: You cannot create a custom options menu if you change the label of the left softkey.
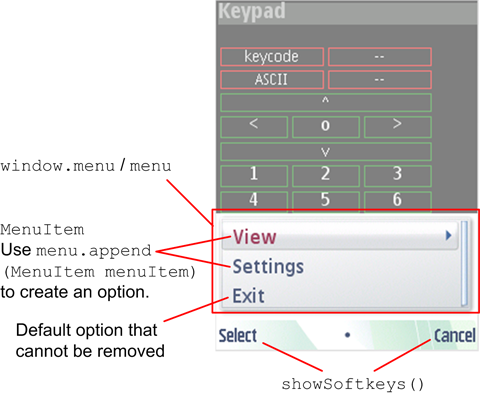
The options menu allows users to control the widget functionality. For example, users can specify settings or move between views in a widget. Examples of options include: Open, Save and Settings. A menu item in the options menu can also open a submenu.
All widgets
have an options menu with the option Exit that you
cannot remove. Add more options by constructing menu items and appending them
to the menu. The label above the left softkey, which can be used to open the
options menu and to select an option, is hidden by default. Use the showSoftkeys() method
of the JavaScript menu object to make the softkey labels
visible in your widget.

Figure: Creating an options menu for a widget
For an example of creating a dynamic options menu that changes depending on the view, see the AccuWidget Example on Forum Nokia.
To create an options menu
Create a menu item using the
MenuItemobject constructor .Add the menu item to the options menu using the
append()method of the JavaScriptmenuobject.Repeat this process for each menu item that you want to add.
The menu items appear in the options menu in the order in which you add them, the first item at the top.
Assign functions to the menu items using the
onSelectproperty of theMenuItemobject.For example, you can create dynamic menu options that change depending on the current selection:
// Creates the main menu
function createMenu() {
    // Create the menu items
    cursorModeMenuItem = new MenuItem("Cursor mode", CMD_CURSOR_MODE);
    tabModeMenuItem = new MenuItem("Tab mode", CMD_TAB_MODE);

    // Assign callback functions to menu items
    cursorModeMenuItem.onSelect = onMenuItemSelected;
    tabModeMenuItem.onSelect = onMenuItemSelected;

    // Tab mode is the default so let's add cursor mode item to the main menu
    window.menu.append(cursorModeMenuItem);
}

// Gets called when a menu item is selected
function onMenuItemSelected(menuId) {
    switch (menuId) {
        case CMD_CURSOR_MODE:
            // Enable cursor mode navigation
            widget.setNavigationEnabled(true);
            window.menu.append(tabModeMenuItem);
            window.menu.remove(cursorModeMenuItem);
            break;
        case CMD_TAB_MODE:
            // Enable tab mode navigation
            widget.setNavigationEnabled(false);
            window.menu.append(cursorModeMenuItem);
            window.menu.remove(tabModeMenuItem);
            break;
    }
}
Figure: Dynamic menu items
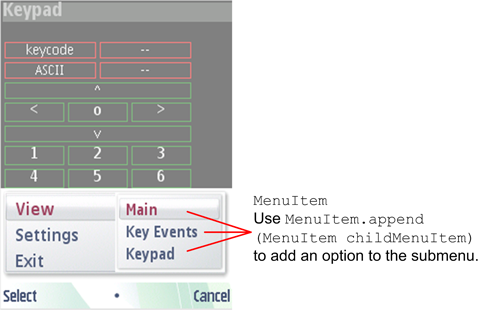
To add a submenu to a menu item
Create a submenu item using the
MenuItemobject constructor.Add the submenu item to the top-level menu item using the
append()method of theMenuItemobject.Repeat this process for each submenu item that you want to add.
Assign functions to the submenu items using the
onSelectproperty of theMenuItemobject.

Figure: Creating a submenu for a menu item