Deployment options
Once the MIDlet is made to run on an emulator, the next step is to deploy it to the target device. The Series 40 software automatically transfers a MIDlet application from a read-only memory card to the phone memory, so that any RMS/Write operations are performed. This section explains following methods to deploy a MIDlet to a device:
USB
Over-The-Air (OTA)
Nokia Suite
NetBeans
For information on Bluetooth deployment, refer Bluetooth deployment.
The USB, OTA and Bluetooth options are available for both Nokia Asha software platform devices and Series 40, where as Nokia Suite and NetBeans are available only for Series 40.
USB deployment
Connect your Nokia device to your computer using a USB cable. Following screen appears on the device.
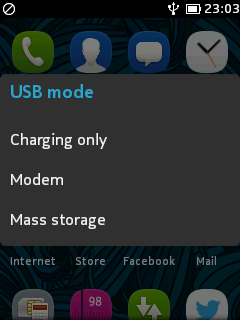
Select Mass storage option in the device. You can browse the memory card contents of the device from the PC’s Window’s Explorer.
Note: You need a memory card for the USB deployment. On Windows 7, the memory card is displayed as a Removable Disk.
Copy the JAR and JAD files of the MIDlet into the memory card of the device. You cannot interact with your device during file transfer.
Click Exit on the device after the file transfer is completed. The message, ”Before exiting, make sure your phone is safely disconnected on your PC first” appears.
Right click on the Safely Remove Hardware and Eject Media on your PC task bar and select to eject your device.
Go back to your device and click OK. You can now browse to the location in the memory card where files are stored.
Select the JAD file and the Install screen appears.
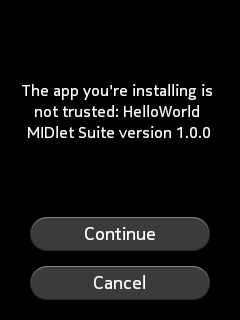
Click Continue to install the MIDlet, and after the installation is completed, click OK to exit the installation window.
Launch the application from the application window.
Over-the-Air (OTA)
With OTA deployment, the MIDlet is installed on a Web server and then downloaded to a device through the Internet microbrowser of the device. A JAR file and a JAD file are required for OTA installation.
The steps involved in a typical MIDlet suite installation are shown below.
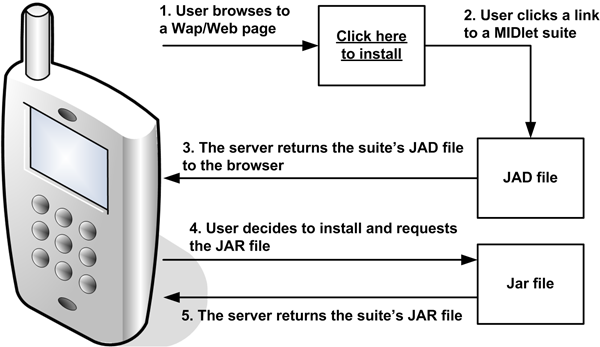
Figure: Typical MIDlet installation process using OTA
In the figure, the process begins by browsing to a page that includes a link to a MIDlet suite. When you click the link, the Web server delivers the JAD file for the MIDlet suite to the browser.
On receipt of the JAD file, it is opened and its contents are displayed. The JAD file contains a description of the MIDlet suite including its size, version number, and who has provided it. A request is then sent for the JAR file and, finally, the Web server delivers the JAR file. Once the JAR file has been delivered to the device, the suite is installed and now you can select and run the individual MIDlets.
To deploy a MIDlet on a device using OTA provisioning:
Edit the JAD file. Change the
MIDlet-Jar-URLattribute so that it points to the JAR file using an absolute URL. For example, if the Web server is running on the local machine, the URL will look something like:http://localhost:8080/HelloWorld.jar. For more information JAR and JAD files, see section Packaging MIDlets.Install the JAD file and JAR file on the Web server.
Create a Web page with a hypertext link to the JAD file. The hypertext link must also be an absolute URL. For example:
<xhtml>
<body>
<a href=http://localhost:8080/HelloWorld.jad>Click here to install</a>
</body>
</xhtml>
Configure the Web server's MIME types so that JAD files are returned with MIME type
text/vnd.sun.j2me.app-descriptorand JAR files are returned with MIME typeapplication/java-archive.Point the device's Web browser (if a Web page has been created) to the URL of the created page. Click on the link.
Every device that supports the Java platform will have a piece of software for application delivery and management. As this software is device specific, the term Application Management Software (AMS) is generally used to describe it. Once a link to a JAD file has been clicked, the device's AMS will activate and display the name, version, and origin of the MIDlet suite.
With the details of the suite displayed, the AMS should give an option to install the suite.
The AMS should now also provide the ability to run any of the installed MIDlets. Run the MIDlet that has just been installed.
For more information on OTA deployment, see the following documents on Nokia Developer:
Nokia Suite
Especially during the development phase, MIDlets can be deployed onto a device by using a direct connection method between the workstation and the mobile device. The available connection types depend on the capabilities of the workstation. Desktop systems are usually connected to mobile devices with USB cables and laptops with wireless connections.
To transfer files or install applications, you need Nokia Suite. After connecting your device to a PC, you can install MIDlets onto a device from the PC Suite main menu:
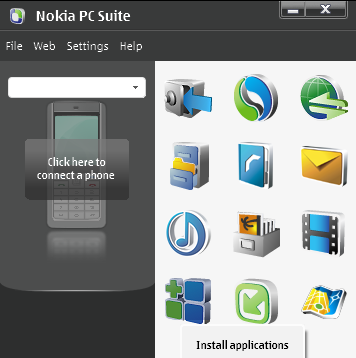
Figure: Installing applications from Nokia Suite
NetBeans deployment
When NetBeans builds a MIDlet
project, it creates a MIDlet suite, which consisting of a JAD file and
a JAR file. You can find these in the project's dist folder.
You can use these files to deploy the MIDlet suite directly to your
Nokia device:
Start Nokia PC Suite and connect your device to your PC using a Bluetooth, infrared, or USB connection. You can now use NetBeans to deploy the MIDlet suite.
Start NetBeans and open the project you want to deploy.
In the Projects pane, right-click the project, and select Properties.
Select Deploying.
In the Select Deployment Method drop-down menu, select Nokia Terminal connected via PC Suite. Save the settings by clicking OK.
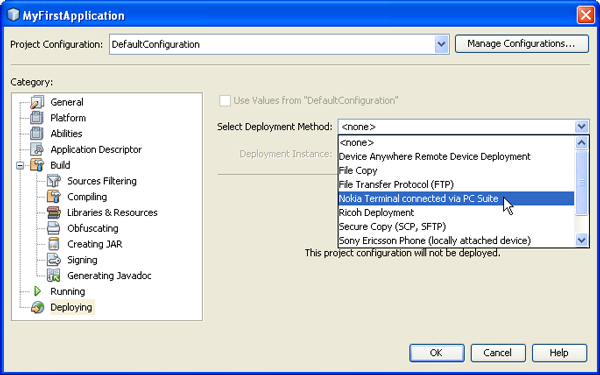
Figure: Deploying a MIDlet suite to a device
In the Projects pane, right-click the project, and select Deploy. The MIDlet suite is sent to the device connected to the PC, where you complete the installation process in the usual way.
After you have installed the MIDlet suite, you can run it in exactly the same way as when it is installed by an user.